The headlight revolution 2023

Further to my previous post, I should really explain what I am thinking about.
The incandescent bulb used in car and bike headlights has not been used for so many years now. I still have the 1967 Ducati 250 which has one as standard, and can remember that some cars from the 1970s had them, but halogen with its extreme white light (or so we all thought at that time) replaced that technology. The vast majority of both of these types of bulb were fitted into a reflector headlight, the incandescent and early halogen reflector headlight had a complex glass which bent the light to give a beam pattern. The later halogens had a clear glass as the beam pattern was computer designed within just the reflector and a clear, normally plastic, glass could be fitted. These clear glass models are perfect to fit a projector headlight inside as a retrofit, even with a halogen bulb.

The next tech was HID xenon that came with a ballast in the supply due to the high voltages and was very expensive to the tune of a £1000+ option on a BMW. A true HID xenon should only be fitted inside of a projector headlight as that is the only way to ensure an accurate low beam cut off. In a reflector headlight without a projector fitted inside, this tech will just blind other drivers as the light filament inside the bulb is not in the perfect position as the halogen bulb would be, the reflector was designed for that halogen bulb. In many of my previous posts I have detailed how to fit a projector into reflector headlights and how to use either halogen or HID xenon in those projectors. Some posts even talk about using what is known as a bi-xenon projector, this name is misleading as it is just a single projector that had both dip and high beam all in one, it can be fitted with either a halogen or a HID xenon system. The following picture is one such retrofit projector, they are all over ebay.

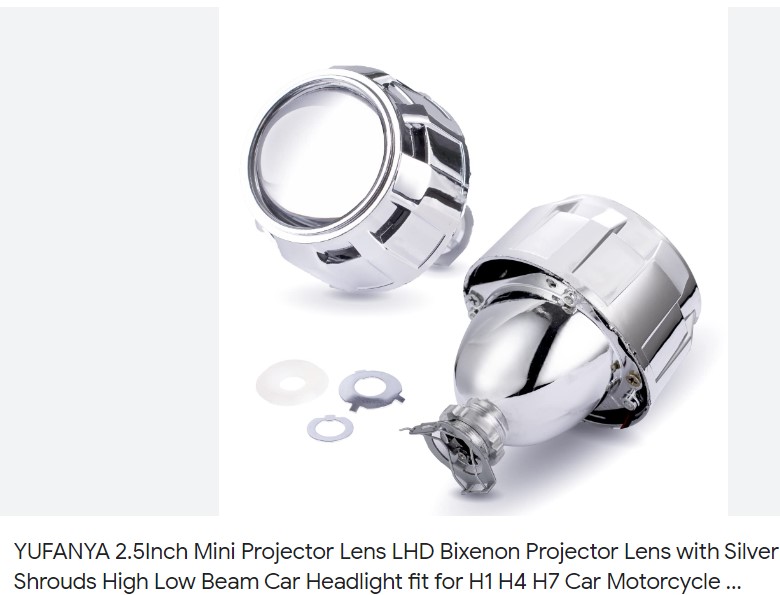
These are normally either 2.5 or 3 inches in diameter. The pack of rings show that these will fit into a reflector headlight with a H4 or H7 bulb as the standard fitting. The projector itself has a H1 bulb base so can be used with a halogen H1 or a HID xenon H1 and a ballast. The trouble with this conversion is that first of all you need to have a clear lens reflector headlight for it to shine through, and secondly you need to be able to remove the glass (perspex) from the reflector to fit the projector inside, and then glue it back together. When fitted this projector does not use the reflector of the original headlight at all, you can paint it black if you want.

The next technology is LED. There are many people out there who fit LED bulbs into reflector headlights, this will never work for the same reasons as HID xenon should not be fitted. An LED is a small square light source giving very directional light output in comparison with a halogen filament that gives light in every direction, 360 degrees. Not one single car or bike manufacturer fits such a bulb into a reflector headlight as it cannot work to the expected beam patterns.

These are LED bulbs with a H7 base. You can see that the LEDs are on two sides with no light at 90 degrees to those LEDs. They also have a fan on the base to keep them cool. My bin is full of different versions of these cheap and easy to fit bulbs as none of them give a correct beam pattern in a reflector headlight, and none of them give out as much light as a halogen bulb in a reflector.

It is now possible to buy complete, full sized, retrofit projectors with LED technology. They are more expensive than the ones in picture one, but they are designed as a complete unit and do the job very well. These do not always use the solenoid operated flap to open the high beam, but use another LED or a laser to give that function, they can be recognised by a more complicated lens design. The following picture shows this.

These are probably the ultimate LED projector retrofit for any vehicle.

The next tech that has appeared is the mini projector. It is also LED powered and is small enough to fit through the hole where a standard halogen H4 bulb fits, into the rear of the headlight. Nothing more than a bulb change, no headlight removal, no glass removal, an easy fit. Here is the picture:

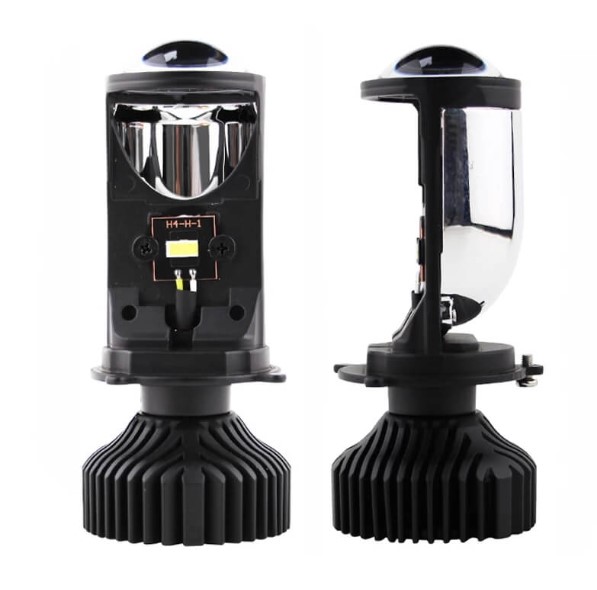
At the bottom is the fan. On the right side of the unit on the right, you can see the silver tube that shines an LED through the lens at the top giving a perfect dip beam cut off. The left picture shows the high beam LED which will use the standard headlight reflector to give the main beam, so you cannot paint the reflector black with this one! These are the ones that I have ordered for the girlfriends Mini Cooper. These seem to also be available with the Laser main beam and a complex lens design as a miniature version of picture three, but as these are quite a new idea, I shall not consider testing these yet.

In conclusion: HID xenon was a great but short lived technology that really needed an automatic light levelling system and headlight washers to be fully legal in many countries, I would not consider using these now. Halogen still has a place for low cost applications. LED is the system of choice now and will be here for a long time, in my opinion. LED also generally uses less power than anything else for older vehicles with older charging systems.

What has been happening

Many things have been happening in my life and in the technology of vehicle lighting.


We have five vehicles here now, the 250 Ducati is still in the garage doing nothing. I have changed the car for a 2018 BMW F31 diesel complete with LED headlights as standard. This car has not got a single incandescent bulb fitted from standard. I have the BMW R1250RS that has LED headlights as standard, the only non LED bulb on the bike is the number plate light for some reason. My girlfriend has a BMW S1000XR, again with LED everything. She has just bought herself a Mini Cooper D from 2013 that is fitted with Halogen H4 headlights and other incandescent bulbs here and there.

Automotive lighting has moved on leaps and bounds with HID xenon going out of fashion and everything going LED. A few years ago you could buy LED bulbs that fitted in reflector headlights, very dangerous things due to the lack of a fixed position for the light source, LED instead of the halogen filament. These things are still sold but just throw light everywhere, even on dipped beam. Just like the HID xenon systems these bulbs need to be in a projector housing.

Projectors have also evolved. There are so many projectors available with integrated LED chips now, they are much nearer to what the manufacturers are fitting to standard LED headlights. There are also very small projectors with LEDs that will fit through a H4 bulb hole and use a separate LED for the high beam into the reflector part of the headlight. I am waiting for a pair of these to arrive and will try them out in the MINI. The theory is very sound, but the test will see what happens.

Long time

Not sure if anyone is still reading this blog, but if you are then I hope that you are still finding interesting things to read.
Many things have happened since I last wrote here. My life has changed in a huge way. My wife and I decided to go our separate ways, she stayed here in France with her Ducati Monster 821, and I went back to the UK for an extended visit with the Ducati Supersport 939. We remain great friends. While I was staying with a joint friend of ours, I had a heart attack. A week later I was operated on and given a triple heart bypass in Southampton hospital, Covid was rearing its head and appeared on the cardiac ward the day after my operation.
Eventually my wife decided to buy a house on an island at the top of Scotland and I moved back here to France.
7 months after the heart operation I was finding the riding position of the Supersport a but hard on the chest so went back to the UK and bought myself a BMW R1250RS in black with all the bells and whistles. I bought it tax free in the UK and paid French VAT when I registered it here.

This was the first thing that I did, remove the shiny dustbin and fit a nice lightweight exhaust from www.dominator.pl, it sounds and looks great for less than €200.
Many other things have been modified but more about them at a later date.
My partner, Trish, has just bought herself a brand new BMW S1000XR that she is running in at the moment.

LED and HID bulbs in headlights

Many people seem to mess with headlight bulbs looking for an improvement. I did some experiments with different bulbs on the Ducati Supersport. The Supersport has a single filament dip beam which is perfect for my experiments as it is a reflector and not a projector headlight. Any old type of bulb can be put into a projector, but the reflector headlight needs the filament of the bulb to be in exactly the correct place to produce the correct beam pattern and cut off.

The first picture shows the LED bulb that I bought for the experiment.

This is the type with a fan rather than a huge heatsink hanging out of the back, it does not really matter which type you use.

Here is the dip beam with a standard H11 55 watt halogen bulb, the type that nearly all cars and bikes are fitted with as standard:

As can be seen in the back of the very messy garage, the dip beam is very clear with a sharp cut off with virtually no light scatter to blind other drivers. This is a standard set up as designed by Ducati.

The next picture shows the Led bulb fitted:

This might look brighter, but it is not, the camera has compensated for the different amount of light. The nice clean cut off has gone because the LEDs are not in exactly the same place as the halogen filament was within the reflector. Loads of the light is being thrown all over the place rather than where the rider wants it, on the road. There is also far too much being thrown into oncoming drivers eyes. I would not be happy riding behind that.

The bike is in a different position in the next two pictures, but they are a comparison. Again the camera has compensated for the different amounts of light, the bottom picture actually has about 3 times as much light as the one below.

Once again this is a standard 55 halogen bulb with a nice dip beam cut off as in the second from top picture.

This one is the 35 watt HID xenon headlight bulb with a separate ballast. The light is much brighter, but again the nice cut off has been lost. This would seriously dazzle oncoming drivers due to the stray light scattering. That is the reason that these should only ever be used in projector headlights. No manufacturer puts HID xenon into a reflector headlight on any standard vehicle.

Led headlights can be specified as an extra on many cars and bikes these days, but none of them are LED bulbs inserted into normal reflectors designed for halogen bulbs, they are whole units with the LEDs as part of the design.

The halogen bulb is now at the peak of its development and cannot really go much further. Many will tell you that their bulb has 10 or 20% more light output, but that is rubbish, if it were possible then everyone would only make these improved bulbs. What those higher power bulbs are doing is to change the colour of the light to a slightly bluer light and fooling the brain into thinking that it is brighter.

Some people also use 100 or 130 watt halogen bulbs, remember that watts is a measure of electricity consumption and not light output as that is measured in lumen. What happens is that the halogen that uses 100 watts does not turn it all into light, but only a small percentage of it, most gets turned into heat to fry your wiring. Why do you think that the experts have come up with 55 watts as the normal bulb?


Something new

My wife and I went for a drive today and ordered a new bike to add to the stable. A black 2018 model Ducati Monster 821. We will keep the ST2 for now as it is comfortable with the Supersport, the 250 single and the BMW K100RS in the garage.

The new 821 comes with some interesting updates, the same 110 bhp engine, but things like colour TFT screen and riding modes similar to the Supersport, improve the bike. She is having the higher “comfort” seat fitted due to having long legs.

When Judes niece comes to visit on her red version of the same bike, it will make interesting outings.

Some of the things planned at the moment are: A noisier lighter exhaust which might include elimination of the catalytic converter, perhaps flatter bars to alter the riding position, a small screen to improve the looks of the bike, exhaust flapper valve removal, and other things.

Watch this space.

Test of the R&G heated grips.

Well it is a chilly 8c here in this part of France today, but the roads are almost dry. Time to test the grips.

Togged up with my thermal merino under garments (thank you Trish) and my 15 year old BMW gloves, off I went. I set the grips on four out of five LEDs showing, so not the hottest setting, and was rather surprised that after abut half a mile the heat was coming through. The controller is a push button that goes through the sequence of one to five LEDs and is very easy to operate with gloves on. If you leave them switched on when you turn the ignition off, as I did to refuel, then they will be switched off when you turn the ignition on again. This is a very useful feature as they are not drawing power when you want to start the bike.

In use, with the extra insulation of a pair of hands inside gloves wrapped around them, they are both of about equal temperature.

I took power for the grips from the bluetooth module plug under the seat on the Ducati Supersport as I am never going to have a bluetooth module fitted on my bike. There are four wires in the plug and the black and the red ones are earth and power that is switched with the ignition. I used the inline fuse that R&G supplied with the kit, but cut down the very long cable that came with it.

When fitting the grips the right hand plastic throttle tube needs the bulge trimming off the end as per R&Gs excellent instructions. R&G also supply individual parts such as just one grip should one get damaged in use.

I must say that I am very happy with this modification and am impressed with the quality of the parts.

Ducati 939 Supersport panniers.

The Supersport has now got nearly 4000 kms on it, and I have loved riding every one of them. One of the first things that I bought was a tank bag, a Givi magnetic one that holds 15 litres. It is the same as the one that can be bought at a Ducati dealer for this bike and fits very well. I have also fitted a USB socket to the front of the bike to plug the tank bag in.

As this bike is such a great all rounder it will benefit from more luggage space. The Ducati panniers that are a very expensive optional extra, just don’t seem as well made as I would expect them to be. 

They also sit very high and to the rear of the rear axle. I prefer weight to be low and as far forward as it can be. So I had some thoughts.

One thing that I did not really want was a set of pannier frames on the bike when I have not got any luggage fitted, it would ruin the looks of a very beautiful bike. So I took the ST2 panniers and frames and started to modify.

I have removed the rear footrests from my bike as I never carry passengers, that allows me to fit the panniers slightly further forward and use the footpeg mount as a pannier rack mount. After cutting the brackets off the standard Ducati ST Pannier mounts I made new brackets to suit the Supersport. There is a strong point at the forward end of the rear numberplate/light hanger that is attached with 8mm bolts, so I used that along with the rear footpeg mount, also 8mm.

The prototype fits very well and looks fine on the bike. The best bit is that it is very quick to attach and remove the mount. So I made a time lapse video to demonstrate.

If anyone wanted to replicate this mount but wants to keep the rear foot pegs, then that would not be a problem, but the bikes rear indicators would need to be move backwards somehow, and the front mount would need to be longer.

As with any panniers on a bike they should not be overloaded (max about 10kgs) and high speed should be avoided.

I will update when I have refined the mounting. The silver pannier inserts are removable and could be painted.

Ducati Supersport horn

When I bought my first new bike back in 1977 at the age of 18, I had my fathers words in my mind, “Make sure that every bike that you own has good lights and a good horn”. That BMW R75/7 had both.

Here we are 40 years later and I have just bought the new Ducati Supersport 939. This bike comes with some decent lighting as standard and has the LED strip for daytime conspicuity, nothing needed there then. The horn on the other hand was like Mickey Mouse farting! It could not be heard over the sound of the engine on tickover. Bikers who have visited this area will know that there is one huge danger on the roads in this part of France – Belgian car drivers. A good horn stops them in their tracks.

The horn of choice was the DENALI Soundbomb Split. I went for the split as there is not much room on the Supersport and with the split I could use both sides of the bike. Here is the kit:

The part on the left is the dual tone air trumpet, the fitted aluminium bracket is my construction – more of that later, centre is the compressor and on the right is the air hose to connect the two. The kit also came with a relay which I threw away and fitted a better quality one.

The trumpet was fitted under the left fairing fillet panel with the home made bracket.

These are the two bolts that hold the fillet panel on, remove them and pull the panel rearwards and it comes off.

The following two pictures show the bracket that I made from aluminium to hold the trumpet. This is bolted with a rubber packer so that it is insulated for vibration from the bracket.

The bracket holds the trumpet out of sight below the fillet panel, and attaches to the top radiator mount and the bolt that holds the existing horn in place. Here it is in position.

The trumpet must have some clearance around it so that it when it is in operation it is not able to touch anything. The original horn is left in place and left connected, it can be seen in front (right in picture) of the bracket leg.

The compressor was fitted on the other side of the bike, also on a bracket bolted to the top radiator mount. The radiator expansion tank hose is a hindrance to using an allen key on this bolt, so a hex head bolt was fitted.

The relay was operated by piggyback wires from the original horn. The reason for keeping that horn is that the electrical system will not operate the Soundbomb alone as it draws too much power and the bike thinks that there is something wrong. The compressor is wired to the battery through the relay and a 25 amp fuse. Note the carbon fibre mounting bracket on this side. I have to thank my aircraft career for the ability to make brackets!

The horn button on the bike is now a thing to be wary of, I would not use it to say hello to someone on the side of the road as the ground shakes when it is pressed. Watch out Belgian drivers!

A small experiment

I say experiment because I have known of these items for years and at last decided to try them. They are Grip Puppies. These things fit over the standard grips in a bike and do a number of things, they make the grips thicker and more comfortable and they add padding so that vibrations are damped when wearing thin summer gloves.

I bought them from ebay LINK, and they were here within a few days. They take 10 minutes to fit over the existing grips with a little soap and water and then are left to dry.

I went out for a ride with them fitted and was instantly impressed with the feel of them.

My wife likes them too so another set will be ordered for her ST2.